Forecast Bar for Apple TV puts the full weather experience on your biggest screen: current conditions, hourly and daily forecasts, animated radar, and severe weather alerts, all designed for the living room. It's part of the same App Store download as the iPhone app — just open the App Store on your Apple TV and download Forecast Bar.
Requires Forecast Bar Gold
The Apple TV app is included with Forecast Bar Gold. If you already subscribe to Gold on your iPhone or iPad, there's nothing to do — as long as your Apple TV is signed in with the same Apple ID, your subscription is recognized automatically.
If you don't have Gold yet, the app shows a subscribe screen where you can:
- Subscribe to Gold — a yearly subscription, purchased right on the Apple TV.
- Restore Purchases — if you've subscribed before but the app doesn't recognize it. If restore finds nothing, make sure the Apple TV is signed in to the App Store with the Apple ID you subscribed under.
See Plans & Subscriptions for everything Gold includes.
First run
The first time you open Forecast Bar on Apple TV, a short setup flow walks you through:
- Welcome — an overview of what the app offers. Select Get Started.
- Sync Forecast Bar — optionally Sign in with Apple to bring your saved locations and settings from your iPhone, iPad, or Mac to this Apple TV. After signing in, the app looks up your account and offers Restore My Settings (pull everything down) or Start Fresh. You can also choose Maybe Later and sign in any time from Settings → Account & Sync.
- Top Shelf — a preview of Top Shelf Weather, the at-a-glance weather strip on the Apple TV Home Screen. Choose Set Up Now to jump straight to its settings, or Continue.
Once you're signed in, your locations and settings re-sync from the cloud every time the app comes to the foreground — changes you make on your iPhone show up on the TV automatically.
The four tabs
| Tab | What it's for |
|---|---|
| Weather | The main forecast screen for the selected location |
| Radar | Full-screen animated radar |
| Settings | Every TV option — see Settings on Apple TV |
| Top Shelf | Configure the Home Screen weather strip — see Top Shelf Weather |
The Weather screen
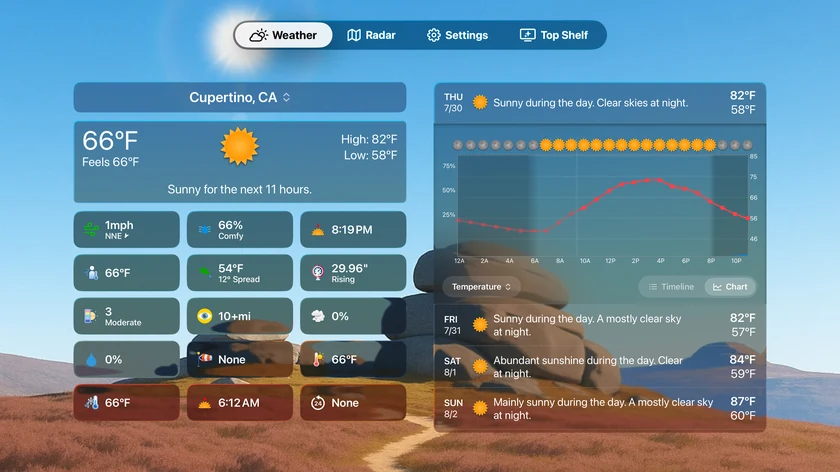
The Weather tab is a two-column layout over the animated weather background:
- Location switcher — the location name at the top left. Select it to open the full-screen location picker (below).
- Current conditions card — temperature, conditions, and today's essentials. Select it to open an extended detail screen with every data point for the current conditions.
- Data point tiles — a grid of your chosen data points (humidity, wind, UV, and so on — pick and reorder them in Settings → Data & Layout). Up to 15 tiles show at once; when a precipitation card or alerts are on screen, the grid shows fewer tiles to make room.
- Precipitation card — appears when precipitation is in the forecast, as a minute-by-minute chart, a 15-minute chart, or a mini radar view. The default view comes from Settings → Data & Layout → Precipitation → Default View.
- Storm Tracker — when a storm cell is closing on the location, a card leads with the verdict (on track for you, or expected to miss) and a live countdown to arrival. It sits directly above the precipitation card, ahead of the alerts, the storm report and the day's outlook, so a storm on its way is the first thing you see.
- Alerts — active severe weather alerts for the location, when there are any. Open one for the full text; a Hide all … alerts row beneath Close hides every alert of that kind — see Hiding alert types.
- Daily forecast column — the right-hand column scrolls through the coming days. Today starts expanded so the hourly detail is immediately visible; select any other day to expand it.
If no location is set yet, the screen shows No Location Set with a Search for a City button.
Locations
Select the location name on the Weather screen to open the Locations picker — a full-screen grid of your saved locations, each card showing its current temperature (or feels-like temperature, if you've turned on Show Feels Like as Primary).
- Add a location — select the search button, then type into the
City name...field and pick a result. Despite the placeholder, the search also finds points of interest and street addresses, so parks, ski areas and airports work too. - Switch locations — select any card.
- Delete a location — press and hold on a card, then choose Delete. If the location is your Home Location, the app asks you to confirm first.
The Radar tab
The Radar tab is the same full radar experience as the iPhone app, adapted to the remote. For what each layer shows, see Radar.
- Play / pause — the focusable button at the bottom left, next to the timeline bubble.
- Step frames — with playback controls focused, press left / right on the remote to step one frame at a time.
- Layer pill — shows the current layer name; select it to open the layer picker.
- Speed pill — the time and speed readout next to the layer pill; select it to cycle the playback speed.
- Scrubber — a focusable progress bar below the pills; scrub directly to any frame.
- Pan mode — the arrows button in the bottom-right stack. While it's active, swipes on the remote move the map directly; press Select or Menu to exit. After you've moved the map, a recenter button appears to snap back to your location.
- Zoom + / − — zoom buttons in the bottom-right stack.
- Warnings — toggles severe weather warning overlays, and opens the color legend explaining them.
- Lightning — toggles recent lightning strikes on the map.
Tip: Set your preferred starting layer in Settings → Radar → Default Layer, and try the Next-Generation Radar experience there too — see Settings on Apple TV.
