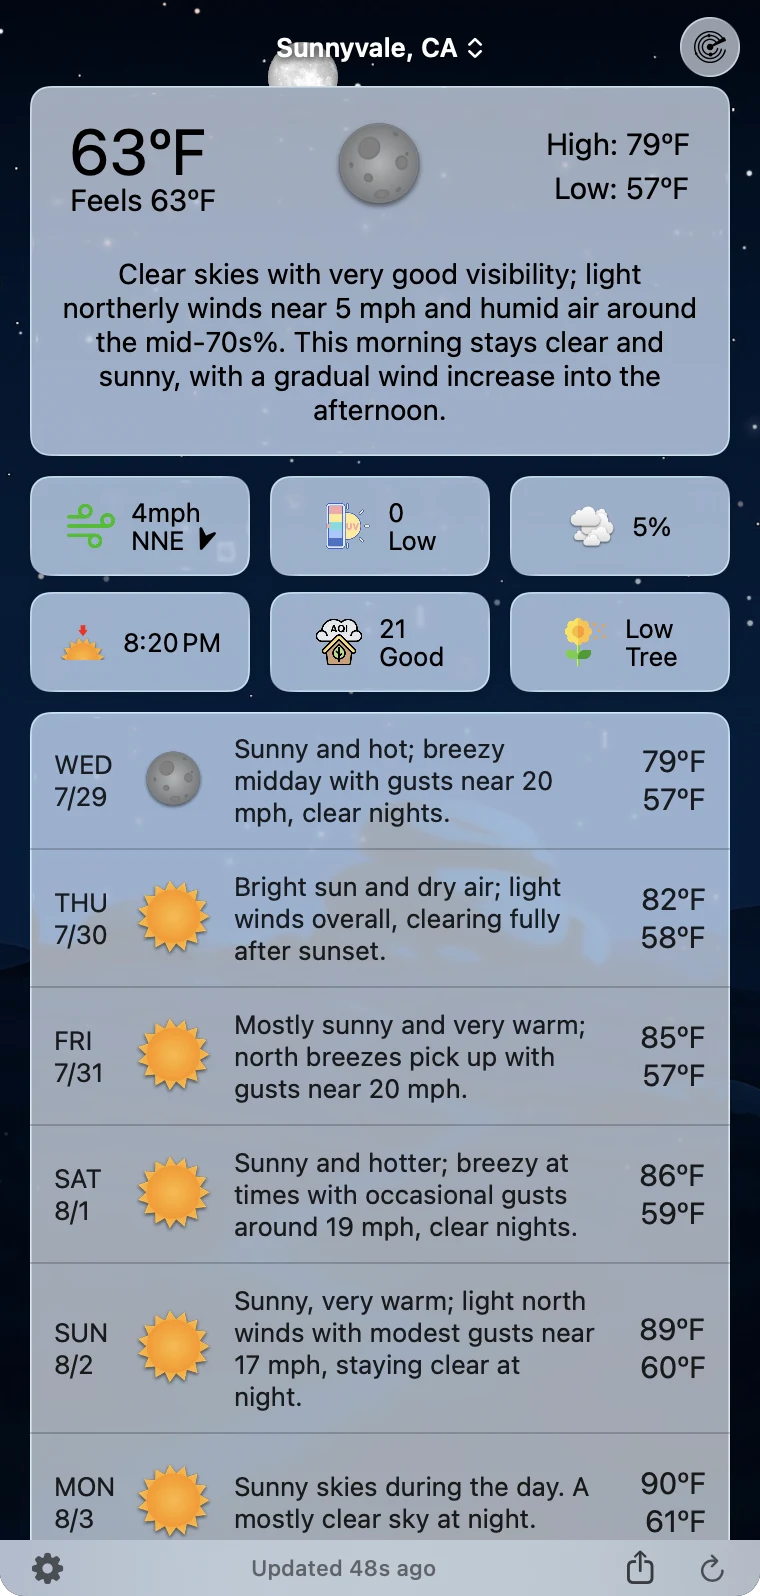
The weather panel is the Mac app's main screen: current conditions, hourly and daily forecasts, precipitation, and every data point, in a compact drop-down attached to your menu bar item.
Opening and closing
- Open: click the Forecast Bar menu bar item. The panel drops down centered under it.
- Close: click the menu bar item again, press ESC, or simply click anywhere outside the panel.
- The panel also closes when you switch to another app (unless you've detached it or you're in Dock Mode).
Tip: ⇧⌘W toggles the panel from anywhere — it's a global shortcut. See Keyboard Shortcuts.
The toolbar
Across the top of the panel:
- Alerts button (warning triangle, left) — appears when there are active weather alerts, with a red badge counting the ones you haven't seen. One alert opens its details directly; more than one opens the alerts list. See Alerts & Notifications.
- Forecast discussion button (document icon, left) — appears while you're viewing current-conditions details; opens the meteorologist-written Area Forecast Discussion for your region.
- Location name (center) — the current location with a small up/down chevron. Click it to open the location switcher (below).
- Radar button (right) — opens the standalone radar window, which floats above the panel and can be resized like any window.
Clicking the current-conditions card itself opens a large details popover with charts for every data point — press ⌘W to close it.
The footer
Along the bottom of the panel:
- Gear (left) — opens Settings.
- Updated time (center) — how long ago weather was last fetched ("Updated just now", "Updated 5 minutes ago"). While AI stories are being written it reads "Personalizing summaries…".
- Visualize Day — plays your whole day out as a moving sky. See below.
- Share Screenshot (right) — captures the panel as an image and opens the macOS share sheet.
- Refresh (far right) — fetches fresh weather immediately; the arrow spins while it works.
Visualize Day
New in 11.4. Your day plays out as a moving sky — the sun, stars, clouds and rain all following your actual forecast, hour by hour, and then looping.
It starts at the current hour and runs a full day forward, so you are watching the weather ahead of you rather than replaying the morning you have already had.

Three ways in, all of which open it in its own window rather than inside the panel:
- The Visualize Day button in the panel footer.
- Right-click the menu bar icon and choose Visualize Day. This is the only route that works without opening anything first.
- View → Visualize Day, or ⌥⌘V.
Once it is playing you can share it as a video, ready to send or post — it opens the same share sheet Share Screenshot uses.
If the command is missing from the menu bar icon's menu, or you are told Visualize Day is not available, there are only two reasons and the app says which: today's hourly forecast has not arrived yet, so there is nothing to play, or your current background style cannot draw an arbitrary weather-and-time combination. Switching to an animated weather scene or a city pack in Settings → Theme & Visual Style → Backgrounds fixes the second.
Resizing the panel
- Height: hover over the center of the footer — the updated time becomes a grab handle. Drag it up or down.
- Width: drag the panel's left or right edge, from 350 up to 600 points.
- Forecast Bar remembers your panel size per display, so it can be compact on a laptop screen and taller on an external monitor.
The panel also resizes itself automatically when you show or hide forecast sections in Settings → Data & Layout.
Detaching the panel
Drag the panel downward, away from the menu bar, and it detaches into a floating window with a title bar and close button that stays open while you work. What the drag does is controlled by Settings → General → Window Detach → Drag-Down Gesture:
| Option | What dragging down does |
|---|---|
| Floating Window | Detaches into a floating window — the default |
| Switch to Dock Mode | Switches the whole app to Dock Mode |
| Disabled | Nothing — the panel snaps back |
To re-dock a floating panel: drag it back up to the menu bar, press ESC, or click its close button. Forecast Bar remembers the detached position and restores it next time. If the detached window ends up somewhere unreachable, use Settings → General → Window Detach → Reset Window Position.
The location switcher
Click the location name in the toolbar to open the location popover:
- Search — type in the "Add a location..." field to search worldwide. As well as cities, it finds points of interest and street addresses — national parks, ski areas, airports, stadiums — and saves the place under the name you picked. An Add to Favorites switch (on by default) controls whether a result you choose is saved to your list or just viewed once.
- Your list — current location stays pinned at the top; saved locations below show a small live conditions readout.
- Edit — click Edit to reorder favorites by dragging, or remove one with the trash button. The current location can't be moved or deleted, and deleting your Home Location asks for confirmation first.
- Compare — when Show Compare Button is on in Settings → Compare & Home → Location Compare Button, each row gets a compare button that opens a side-by-side comparison window across your locations.
Tip: Switch locations from the keyboard: ⌘1–⌘9 jump to saved locations, ⌘0 to the tenth, and ⌘` to your current location.
